Managing Active Directory Password Policies
Stories of malicious users taking advantage of legitimate credentials to break into IT systems and steal sensitive data for either financial gains or personal benefits have been increasing at an alarming rate. According to the 2016 Verizon Data Breach Investigations Report released in April 2016, 63% of confirmed data breaches involved misuse of weak, default or stolen passwords.
Strengthening your Active Directory password policy settings is one of the simplest things you can do to help prevent users gaining access through legitimate credentials.
This blog discusses the steps that IT teams should take to strengthen the Active Directory Password Policy Settings of the organization.
Creating Strong Passwords
Simply put – stronger passwords are more difficult to crack than weak ones. The weaker the password, the more likely it can be hacked by a malicious user.
It is usually the responsibility of an IT administrator to make sure that the passwords are strong enough. Generally, user identity authentication in the popular operating systems (including Windows) happens via a secure password (a combination of alphabetic letters, numerals and special characters etc.) which is meant to be entered when logging into the system in order to prove identity. Users are advised not to share their system passwords with anyone, including colleagues and superiors.
To strengthen security and further ensure prevention of unauthorized account access, IT administrators can introduce stringent password rules to prevent easy to guess passwords.
Some of the example restrictions may include:
- Length of the password should be greater than eight characters
- The password should include special characters, numbers and symbols
- The maximum number of failed attempts to enter the password should be no more than three. There should be an alert mechanism, which sends an email to the IT administrator informing that someone is trying to gain access to that user account if the number of attempts is exceeded.
View Default Settings
To view the default values of policy settings, simply open the Group Policy Management Console, select your forest domain, expand it and navigate to Group Policy Objects. Select the Default Domain Policy tab, navigate to the right panel and click on the “Settings” tab as shown in the screenshot below:
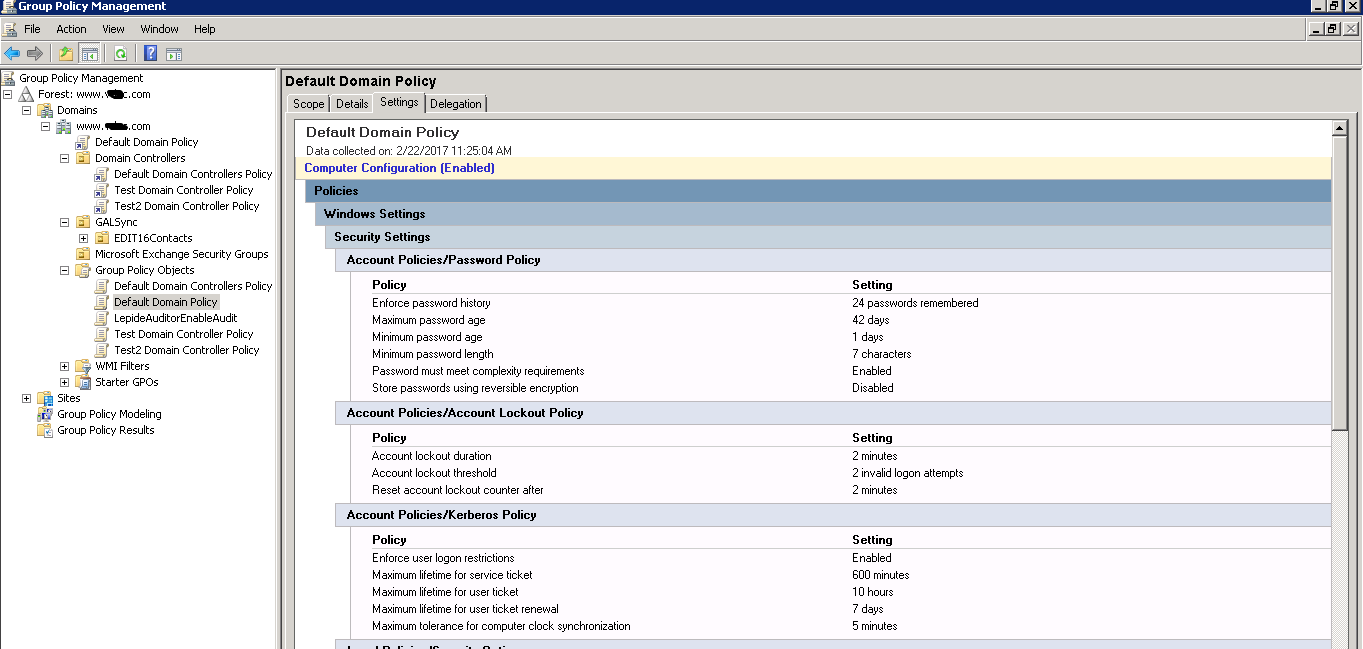
Figure 1: Viewing default Group Policy
Tweak Default Settings
Tweaking the default settings in the Active Directory Password Policy helps establish a secure network and reduce the amount of cyberattacks that may lead to loss of critical information and sensitive data.
Follow the steps below to customize the default settings in the password policy and further strengthen your IT defense mechanism:
- Open the Group Policy Management Console and expand the forest of the domain you wish to choose
- Expand the “Domain Controllers” node. You can either create a new Group Policy Object or edit an existing one
- In the left panel, do a right click on the selected GPO and click “Edit”
- In the Group Policy Management Editor, navigate as per the following path –
“Computer Configuration” à “Policies” à “Windows Settings” à “Security Settings” à “Account Policies”
- Find the three policies in it– Password Policy, Account Lockout Policy and Kerberos Policy
- Now, tweak the default settings for “Password Policy” as per the security mechanism you prefer to implement in your Active Directory
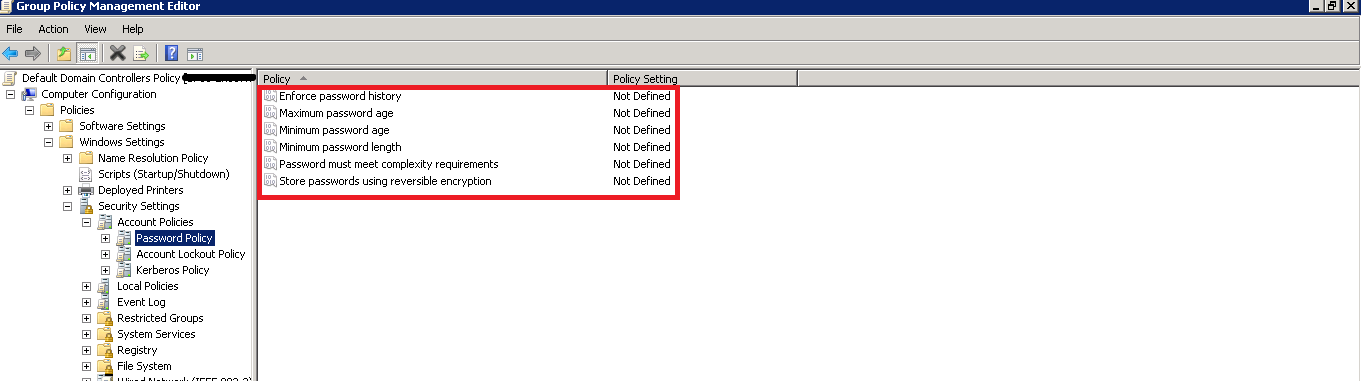
Figure 2: Policies for Password Settings
In order to strengthen the security of the Active Directory environment, it is recommended to define values for all the policies shown in the above screenshot, which includes:
- Enforce password history
- Maximum password age
- Minimum password age
- Minimum password length
- Password must meet complexity requirements
- Store Passwords using reversible encryption
The values for these policies can be defined by simply accessing their properties.
- Defining “Enforce Password History” policy
Access the properties of “Enforce password history” policy.
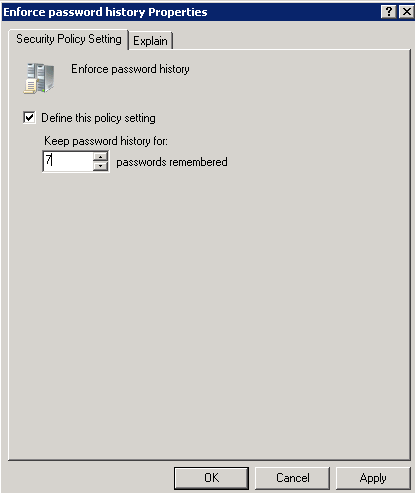
Figure 3: Enforce Password History Policy
Now check “Define this policy setting” and fill the desired number in the field “Keep Password History for” by clicking the up and down arrows to mention how many previous passwords, you want the Active Directory to remember. Next, click “Apply”.
If the password policy is already defined, then also you can modify the values as per your requirements using the same procedure as above.
- Defining “Maximum Password Age” and “Minimum Password Age” policy
Access its properties.
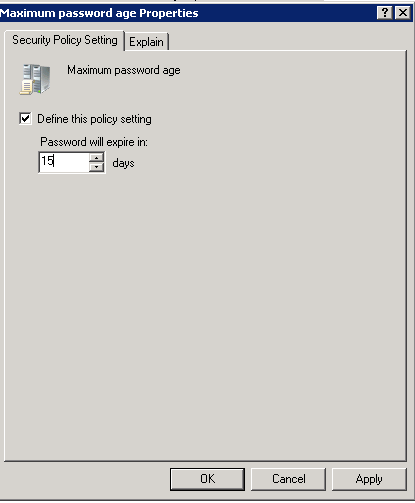
Figure 4: Maximum Password Age Policy
Enter a value in the field “Password will expire in:” and use the up and down arrows to select the number of days. Click “Apply”.
As soon as the policy is applied, it will automatically define the “Minimum password age” policy as 1 day subtracted from the number of days you have defined for the maximum password policy. Here, since 15 days is defined as the maximum password age, the minimum password age will be automatically set to: 15-1 =14 days.
If already defined, then also you can modify the values using the same procedure. Please note that changing the maximum password age will automatically change the minimum password age also.
- Defining “Minimum Password Length” policy
Access its properties.
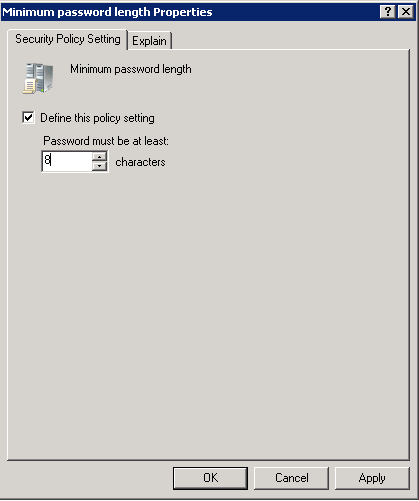
Figure 5: Minimum Password Length Policy
Check whether this property is already defined or not. If not defined, check the field – “Define this policy setting” and enter a value equal to or greater than eight characters in the field “Password must be at least:”. Click “Apply”.
If the policy is already defined and the number of characters in the “Password must be at least” field is less than eight, then redefine the policy using the same procedure as above and ensure that the value is equal to or greater than eight in order to tighten the security mechanism.
- Defining “Password must meet complexity requirements” policy
Access its properties.
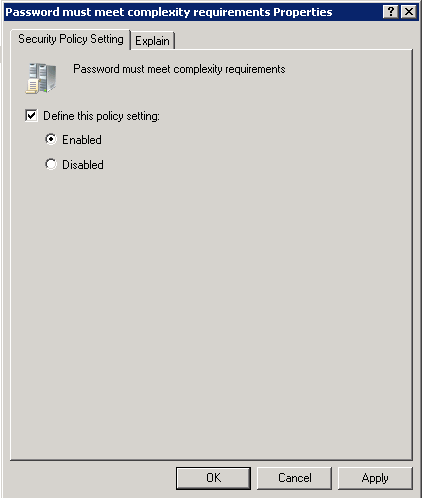
Figure 6: Password Complexity Policy
Check the field – “Define this policy setting” and select “Enabled” in order to set parameters of complexity requirements on the password. Click “Apply”.
- Defining “Store Password using Reversible Encryption” policy
Encrypting passwords is a great way to avoid security glitches. This is how you can store passwords using Reversible Encryption. Access the properties of “Store passwords using reversible encryption Properties” policy.
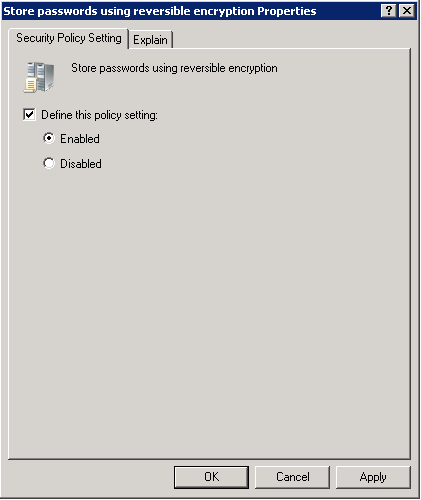
Figure 7: Password Storage Policy
Check the field – “Define this policy setting” and select the radio button “Enabled” to allow the system to store passwords using reversible encryption. Click “Apply”.
Conclusion
Ensuring a secure Active Directory network largely depends on the commitment of security professionals and IT administrators working in collaboration. The most important step in moving towards a secure IT environment is tracking the activity of users within the network who have access to sensitive IT systems, servers and corporate infrastructure.
If you find that native auditing is too time consuming or difficult then you can always deploy an automated solution, such as LepideAuditor for Active Directory. This solution provides pro-active auditing and reporting for Active Directory that instantly notifies users through emails, notifications (to LepideAuditor App on Android or Apple platform) and updates to a LiveFeed widget whenever any critical change is made. To find out more about this solution and download its trial version, visit www.lepide.com.

